 by Kars Alfrink
This post continues a series of blog posts in which I provide recommendations about tabletop game design. This won’t necessarily teach you how to design a game, but it will help you along as you build it.
In this post, I’m going to talk about the prototyping.
The Crappy First Prototype
When I get an idea for a game, I rush to a Word document, a pack of index cards, or a physical notebook, and I write down everything that’s pouring out of my head. I document abstract ideas, specific mechanics, materials, and anything else that comes to mind.
Then I need to see what it looks like on the table, and I build my Crappy First Prototype.
I intentionally use scrap for the first prototype. I use torn-off bits of paper for counters, printer paper for boards, binder clips for pawns; anything that’s nearby.
I do this for a couple of reasons:
- Your game will change so much that any time or expense you put into any item probably won’t be worth it. You won’t use that item in the final product anyway.
- If you invest time and thought in “perfect” materials, your unconscious mind will favor the mechanics using them. It’ll be harder to change something that’s a poor fit for the game.
- Cheap materials will spur you to create a cooler game. Your mind will spawn all sorts of cool ideas for materials as you struggle with paper chits.
For an RPG, you may not need any materials. For a card game, I recommend blank (that is, unlined) index cards, which you can buy in huge, inexpensive quantities at any office supply store. For board games, use 8.5×11″ paper taped together for boards. I take a highlighter to a paper and tear off bits to create tokens, markers, and pawns. Coins and binder clips are great pawns.
The Early Play Test Prototype
Eventually, you’ll need to show the game to other people.
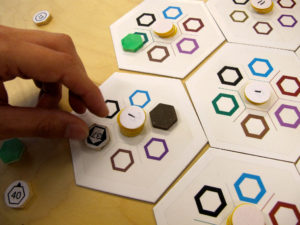
At this point, I replace the low-quality materials with something better, but still simple. For tokens, I’ll use plastic poker chips, for example. The point is to move away from scrap, but still avoid investing serious cost. Your game is still going to go through a lot of changes.
I’ll also format my rules into a form that’s easier to read, with headers and some form of organization. This isn’t anywhere near the final version with cool fonts and fancy art, but it’s at least formatted in a way that other people will understand, and I fill out any “(NEED TO FILL THIS OUT LATER)” sections.
Remember, you’re not showing this to everyone in the world; just a few friends who can give you an idea of whether the basic mechanics work.
The Reasonably Nice “Public” Prototype
Once you’ve run your game with a few friends, you can turn this into something closer to a final game.
Find materials closer to the final version. For a board game, The Game Crafter sells spare tokens, player pieces, etc. For a card game, you can also use The Game Crafter to order a cheap version of your cards. You’ll be showing your game to people who are less familiar with your aesthetics and expectations, so it’s important that the components suggest the game.
Now’s the time to really think about how to format your rules and make them look interesting and inviting. If we had large budgets, we’d plan for art ahead of time, but indie developers rarely have that luxury. Now you can look for art to slot into your rules and the actual presentation of your game.
Once you’ve gone through a few playtests with your “public” prototype, you can look into actually publishing your game. But that’s another post.
What's Here?
3D PrintingAnime
Drawing
Model Kits
Tabletop RPGs
Video Games
Workshop
Worldbuilding
Panels
Syndicate
![[Atom feed]](/user/themes/geek-archaeology/images/atom-feed.png)
![[RSS feed]](/user/themes/geek-archaeology/images/rss-feed.png)
![[iTunes podcast feed]](/user/themes/geek-archaeology/images/itunes-feed.png)